
How to Integrate Social Login in a Web API Solution
During my career, I’ve been involved in multiple web projects where the social login feature was a must.
During my career, I’ve been involved in multiple web projects where the social login feature was a must. There are many tutorials that explain how to integrate Social Login into a website, but very few that show how to integrate Social Login in a Web API solution.
This post is designed to offer a step-by-step tutorial on how to integrate Google Sign-In and manage users in your Web API back-end effortlessly.
The sample code is written using ASP.NET Core 3.1 for back-end and Angular 9 for front-end, but this can be implemented in any other server/front-end frameworks. The source code is available on GitHub.
Sequential flow:
- The front-end client sends a login request to Google
- Google auth server responds with an id_token and user information (first name, last name, email, etc.)
- The client application sends the id_token to the back-end server
- The back-end validates the token using Google auth server and gets the user information from it
- On the back end, we check if there is already a user with that email address from Google’s response. If so, the external login is linked. If not, a new user and link with external login is created
- On success, the server sends a JWT token back to the client
Official guide from Google: Authenticate with a backend server.
How to Integrate Social Login in a Web API Solution: Prerequisites
Google OAuth Client Configuration
- Navigate to Integrating Google Sign-In into your web app and select Configure a project.
- In the Configure your OAuth client dialog, select Web server.
- In the Authorized redirect URIs text entry box, set the redirect URI. For example,
https://localhost:44329/signin-google - Save the Client ID and Client Secret.
- When deploying the site, register the new public url from the Google Console.
Back-end server
Front End
- Angular CLI version 9.1.1.
- Node 10.13 or newer
- Visual Studio Code or your preferred editor
Setup
Clone the repo
Git clone: https://github.com/ionutneagos/social-login-web-api.git
Server
Solution structure:
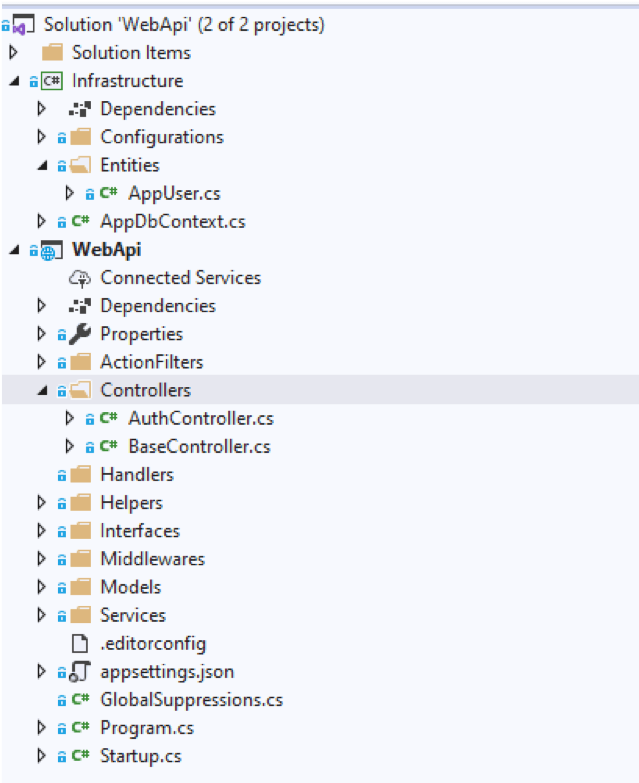
The logic to validate users is implemented in the WebApi project and the Infrastructure project is used for data persistence.
Navigate to WebApi Project -> appsettings.json, and update it according to your credentials.
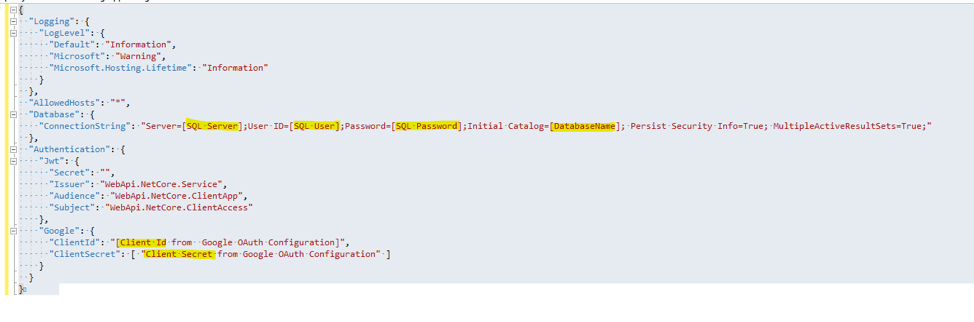
To validate Google users, we need to add a route/action to receive the Google token from the front-end application. In the AuthController class I added the GoogleAuthenticate post action, which requires a model as a parameter: GoogleUserRequest.
Note: You can choose to send only one parameter – string id_token. I chose to use a model to be able to send extra information.
//Google User Request Model
namespace WebApi.Models.Auth
{
using Newtonsoft.Json;
using System.ComponentModel.DataAnnotations;

public class GoogleUserRequest
{
public const string PROVIDER = “google”;

[JsonProperty(“idToken”)]
[Required]
public string IdToken {get; set;}
}
}
// GoogleAuthenticate
[AllowAnonymous]
[HttpPost]
public async Task GoogleAuthenticate([FromBody] GoogleUserRequest request)
{
if (!ModelState.IsValid)
return BadRequest(ModelState.Values.SelectMany(it => it.Errors).Select(it => it.ErrorMessage));
return Ok(GenerateUserToken(await _userService.AuthenticateGoogleUserAsync(request)));
}
We need to validate the IdToken value. To achieve this, I used the Google.Apis.Auth package. Note, this is for .NET Core 3.1 . When I wrote this sample, I used 1.45.0-beta01 version. The previous versions are not compatible with .net core 3.1.
public async Task AuthenticateGoogleUserAsync(GoogleUserRequest request)
{
Payload payload = await ValidateAsync(request.IdToken, new ValidationSettings
{
Audience = new[] { Startup.StaticConfig[“Authentication:Google:ClientId”] }
});
return await GetOrCreateExternalLoginUser(GoogleUserRequest.PROVIDER, payload.Subject, payload.Email, payload.GivenName, payload.FamilyName);
}
When you are validating the token, it’s very important to create the audience for your Google Client ID. This way you will ensure that the token is for your application.
Based on Google auth server response, in the method GetOrCreateExternalLoginUser  we have to check if the user is already registered with that email address, and if not, we will create a new one in the database.
private async Task GetOrCreateExternalLoginUser(string provider, string key, string email, string firstName, string lastName)
{
var user = await _userManager.FindByLoginAsync(provider, key);
if (user != null)
return user;
user = await _userManager.FindByEmailAsync(email);
if (user == null)
{
user = new AppUser
{
Email = email,
UserName = email,
FirstName = firstName,
LastName = lastName,
Id = key,
};
await _userManager.CreateAsync(user);
}
var info = new UserLoginInfo(provider, key, provider.ToUpperInvariant());
var result = await _userManager.AddLoginAsync(user, info);
if (result.Succeeded)
return user;
return null;
}
As the last step, in GenerateUserToken, based on GetOrCreateExternalLoginUser result, we generate a JWT token and send it back to the front-end.
private UserToken GenerateUserToken(AppUser user)
{
var tokenHandler = new JwtSecurityTokenHandler();
var key = Encoding.ASCII.GetBytes(Startup.StaticConfig[“Authentication:Jwt:Secret”]);
var expires = DateTime.UtcNow.AddDays(7);
var tokenDescriptor = new SecurityTokenDescriptor
{
Subject = new ClaimsIdentity(new[]
{
new Claim(ClaimTypes.Name, user.Id) ,
new Claim(JwtRegisteredClaimNames.Sub, Startup.StaticConfig[“Authentication:Jwt:Subject”]),
new Claim(JwtRegisteredClaimNames.Jti, Guid.NewGuid().ToString()),
new Claim(JwtRegisteredClaimNames.Iat, DateTime.UtcNow.ToString()),
new Claim(ClaimTypes.Name, user.Id),
new Claim(ClaimTypes.Surname, user.FirstName),
new Claim(ClaimTypes.GivenName, user.LastName),
new Claim(ClaimTypes.NameIdentifier, user.UserName),
new Claim(ClaimTypes.Email, user.Email)
}),
Expires = expires,
SigningCredentials = new SigningCredentials(new SymmetricSecurityKey(key), SecurityAlgorithms.HmacSha256Signature),
Issuer = Startup.StaticConfig[“Authentication:Jwt:Issuer”],
Audience = Startup.StaticConfig[“Authentication:Jwt:Audience”]
};
var securityToken = tokenHandler.CreateToken(tokenDescriptor);
var token = tokenHandler.WriteToken(securityToken);
return new UserToken
{
UserId = user.Id,
Email = user.Email,
Token = token,
Expires = expires
};
}
After completing all these steps, the server is ready and you can start it.
Note: Automatic migrations are applied on application startup, so you do not need to generate them manually. For doing this, I used EFCore.AutomaticMigrations package.
Front-End
The front-end is built as an Angular standalone application using npm commands. In order to remove dependencies between UI component frameworks and Angular, the front-end HTML/CSS uses plain and simple Bootstrap and is built with Angular 9 using the Angular CLI. This reduces dependency restrictions on any UI component framework.
Install dependencies running npm install command.
Navigate to Angular.Client/GoogleLogin/src/environments -> environments.ts, and update it according to your credentials:
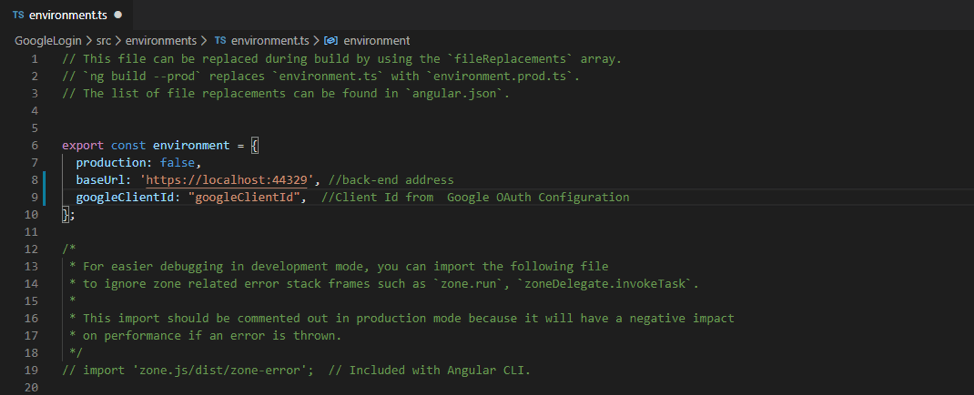
To use Google’s login window, I installed Angular 9 Social Login package: angularx-social-login.
In the components folder, I created a simple angular component, which on click event will trigger the flow for the Google authentication process:
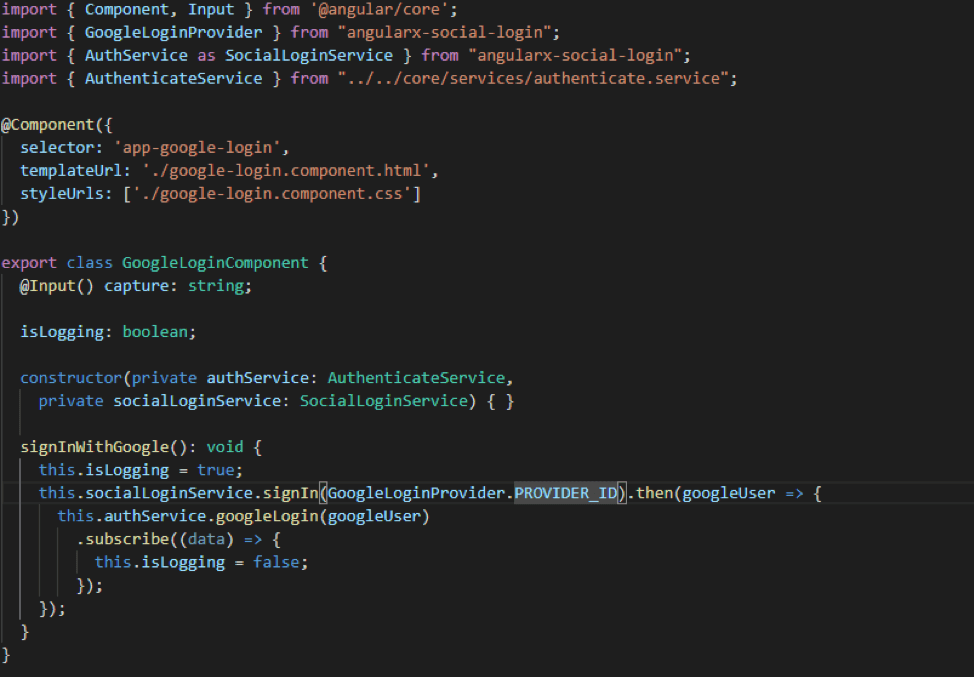
The response is passed as an input parameter to our logic to validate users, which is implemented in the AuthenticateService.
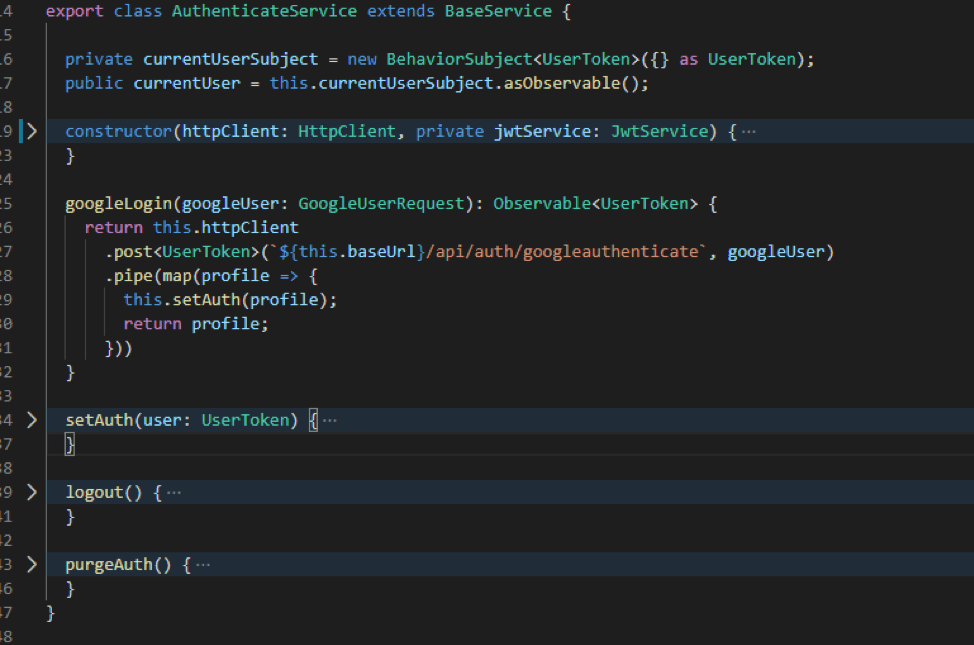
This is pretty much it. You can now start the angular client using ng serve command and test it out.
How to Integrate Social Login in a Web API Solution: Conclusion
If you have any specific issues/questions in a similar setup, please let us know, along with how you fixed them. We will create an updated post to address them.
AI Delivery Squad
Need ongoing capacity? Our engineers embed in your organization and ship production AI continuously. Not a consulting rotation. A dedicated team aligned to your vision mission, operating inside your systems.
More articles

Agentic AI
Governed by Design: How Agents Build Data Products You Can Trust
AI agents can build a dashboard in minutes, but can you trust the number on it? Here’s how our agent harness delivers verified reports, and why it stops when a number isn’t governed.
Agentic AI
The AI-First SDLC: From Coding to Context Engineering
Software engineering stopped being about writing code. It became about managing context.

Production AI
AI This Week: The Harness Arrives | Week of July 14-July 20, 2026
Every week I filter roughly 15 AI newsletters down to what matters for production teams.

Production AI
AI This Week: Fault Lines | Week of July 7-July 13, 2026
This week had one theme: fracture. Three frontier labs shipped models in 72 hours.

Production AI
AI This Week: The Stress Test | Week of June 29-July 5, 2026
Eighteen days without a frontier model is a long time when your production systems depend on it.

Production AI
AI This Week: The Control Layer | Week of June 22-28, 2026
This was the week everyone stopped fighting over AI intelligence and started fighting over AI control.